Latest welding machines often offer advanced features and controls, including 2T/4T mode. However, people often wonder what 2T/4T stands for and whether they need it?
The 2T/4T mode is a simple little feature that might help you get more control over the bead and reduce hand fatigue when you weld extended periods. So yes, it is a valid option to have, but it is not essential.
Let’s look at what 2T vs 4T represents, what’s the difference and how it works in MIG and TIG welding.
What Does 2T/4T Stand For?
To answer as simple as possible, you should note one thing first. The “T” in 2T/4T mode stands for touches. So, if you select the 2T mode, you will need two touches to initiate and finalize your welding arc. Long story short, you press the switch on your torch and hold it. Then, once you release the trigger, the arc stops, and you conclude welding.
On the other hand, as the name states, with the 4T mode, you will need four touches to start and complete your arc. So how does it work?
You will have to press and release the trigger to start an arc. Once you release it, your arc keeps going until you hold and rerelease it. That’s how the 4T mode can help you reduce hand fatigue when dealing with longer beads or working in tight spaces. This is a pretty straightforward explanation, but the use of 2T/4T mode differs when dealing with MIG and TIG welding. So let’s look at the differences of 2T/4T mode in MIG and TIG welding.
2T vs 4T Mode in TIG Welding
When it comes to TIG welding, 2T/4T mode will reduce hand fatigue, but it also affects the quality of your welds. Therefore, this feature is often used to replace the foot pedal. However, 2T/4T cannot reproduce the foot pedal’s amperage control.
Remember that you cannot use the foot pedal and TIG torch simultaneously. So before you start TIG welding, make sure you set your goals straight.
When it comes to TIG welding, 2T/4T mode will reduce hand fatigue, but it also affects the quality of your welds. Therefore, this feature is often used to replace the foot pedal. However, 2T/4T cannot reproduce the foot pedal’s amperage control.
2T in TIG welding
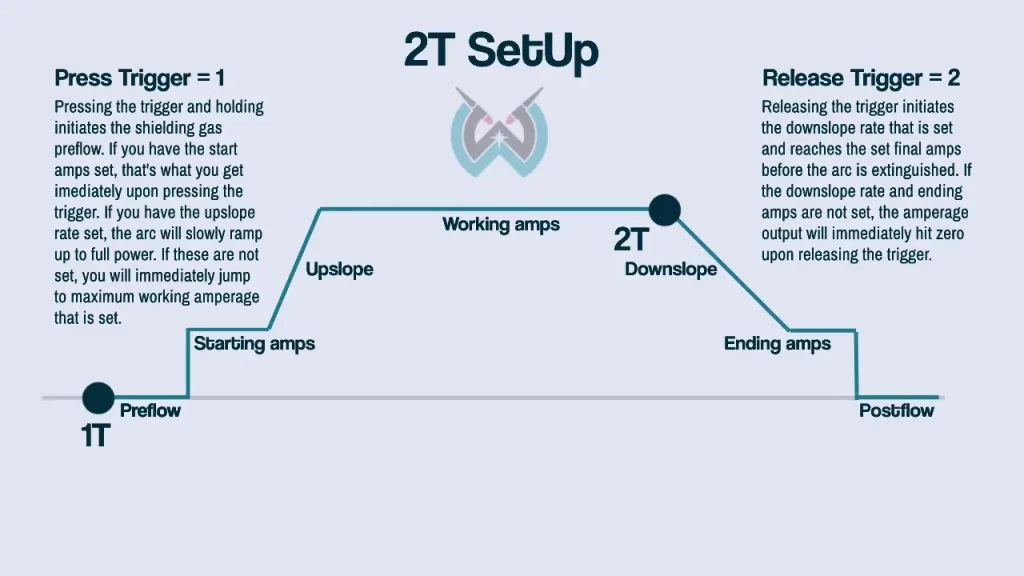
2T in TIG welding is pretty straightforward. You press the torch trigger, and the machine reaches the selected amperage. The arc is present as long as you hold the trigger. Once you release it, the arc slowly shuts down.
This is the often used method when dealing with mild steel. However, you can set up the ramp-up and ramp-down for thin materials such as aluminum. The Ramp-up feature reaches the set amperage gradually, preventing the burn-through.
4T in TIG welding
4T in TIG welding is a bit different and more complex. You have control over the stages of the welding cycle and when each stage begins and ends. Before you start welding, you will have to adjust start and end amperage.
So, to start the weld, you will have to press and hold the trigger. While you are holding the trigger, the pre-flow begins, and the machine forms the puddle by using the start amperage you’ve set. This is ideal when the job needs preheating of metal or you don’t want to achieve the maximum set amperage straight away.
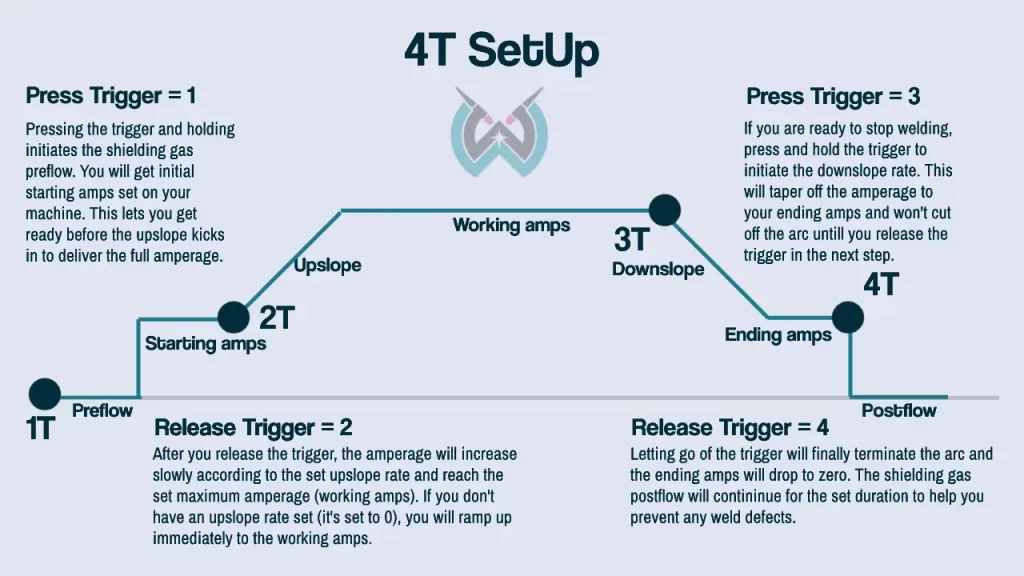
Next, you will have to release the trigger. Once you release it, the machine begins the preset upslope cycle until it reaches total operating amperage. After that, your TIG welder will continue welding at the selected amperage until you press and hold the trigger again.
Once you press and hold the trigger, the torch will implement the downslope settings and continue to the end current phase. The downslope process will allow you to fill the crater to the point when there is no over-melting.
To stop welding, release the torch switch, and the arc will end. Then, finally, the post-flow cooling of the torch will begin.
If you have been counting, 4T mode occurs in four phases where you initiate and end an arc. So even though it sounds complicated, you get an unmatched control of each course of the welding process.
2T/4T in MIG welding
2T/4T mode in MIG welding isn’t as complex as it comes to TIG welding. MIG welding is a straightforward process to operate and master. However, as it stands, you don’t have features such as pulsed TIG, squarewave TIG, or start current and end current settings. Therefore, 2T/4T mode in MIG welding offers more functionality to your MIG gun.
2T Mode in MIG Welding
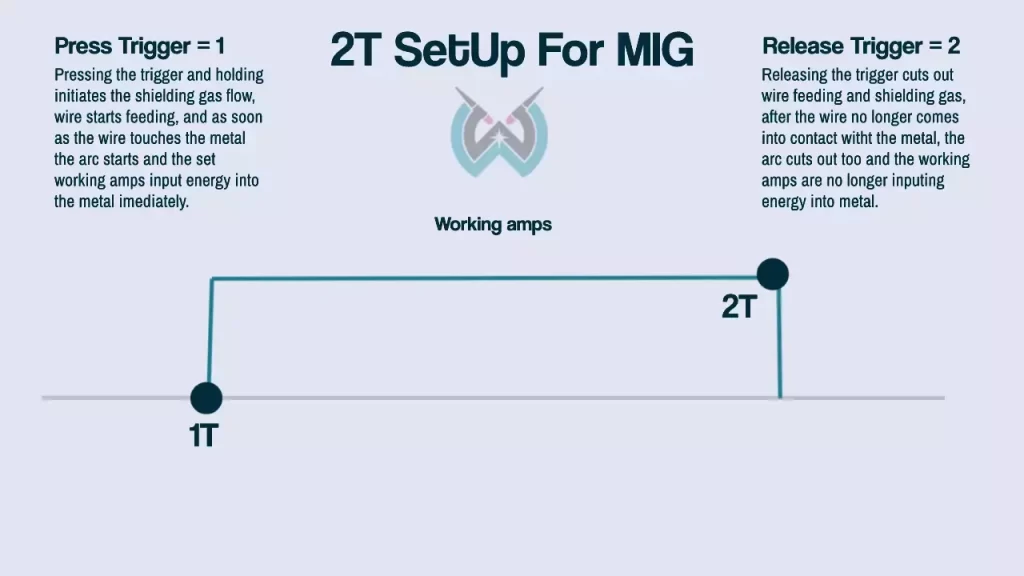
2T mode in MIG welding is standard, as it is incorporated in every welder. In a nutshell, you set your amperage and wire feed speed, and the weld arc is present as long as you press and hold the torch switch.
Compared to 2T in TIG welding, you cannot set the ramp-up amperage. That means the arc will reach its fixed maximum power straight away.
4T Mode in MIG Welding
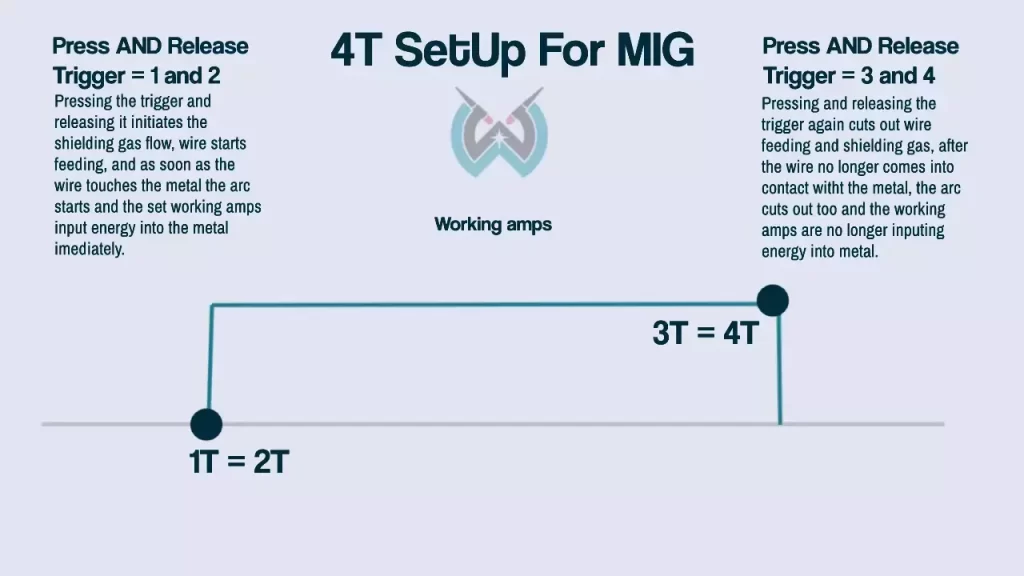
4T mode in MIG welding works pretty much the same as TIG welding. Generally, you press and release the switch to initiate an arc and then press and rerelease it to conclude it. That’s why 4T is ideal when tackling longer beads.
However, with 4T mode in MIG welding, you cannot set up upslope or downslope amperage. So its primary function is reducing exhaustion.
2T vs. 4T – Pros and Cons
2T mode is an excellent and simple machine operation for beginners and weekend warriors. The biggest advantage is that you can master it quickly, and it is a handy feature to have when doing shorter welds.
As you may have deduced, 2T perfectly succeeds in tack welding, stitch welding, or welding small joints. On the other hand, the 4T mode takes time to perfect. However, many people who master this operation never return to the pedal.
4T mode thrives in longer welds and conditions where stamina is essential. In addition, you can use it to work in cramped spaces and deal with “exotic” metals (for example, aluminum) that require delicate amperage control.
Resources:
- Everlast Forum – https://www.everlastgenerators.com/forums/showthread.php/316-What-is-2T-4T-What-does-it-do
- MIG Welding UK – https://www.mig-welding.co.uk/forum/threads/2t-vs-4t-torch-control.80211/
- 2T/4T Feautere explained by Eastwood https://www.youtube.com/watch?v=uKH479512Ds
- Setting TIG welder by Welding Tips and Tricks https://www.weldingtipsandtricks.com/tig-inverter-settings-part3.html


