Wouldn’t it be amazing to have a unique cool and custom welding helmet?
Most helmets on the market have that strict cold design which is understandable considering the welder’s work. Hoods are usually plain black or some other industrially looking color.
![Best Custom Welding Helmets & How To Paint Your Hood [2025] 1 featured image for best custom welding helmet article](https://weldingpros.net/wp-content/uploads/2022/10/best-custom-welding-helmets-1024x563.webp)
Since you are reading this article my guess is that you don’t like that. There are those of us who have an artistic mind and we love to express ourselves through our gear and what better way to do that than with a cool-looking helmet.
In this article, I will guide you through the selection of the most interesting cool & custom welding helmets but other than their looks these helmets are also packing some awesome features as well. What’s the point of having a beautiful helmet if it’s not going to get the job done right?
All helmets reviewed here meet the standards of ANSI Z87.1 – 2003 (also referred to as ANSI Z87+), which ensures that lenses and helmets have met the expectations of independent testing, showing that they can withstand high-velocity impact.
Here is a Quick Comparison of the hoods:
| Image | Name | Specials | Arc Sensors | Shading Level | Light Mode Shading | Viewing Size | Check Price |
|---|---|---|---|---|---|---|---|
![Best Custom Welding Helmets & How To Paint Your Hood [2025] 2 Lincoln Electric Viking 3350](https://weldingpros.net/wp-content/uploads/2022/11/lincoln-viking-steampunk-helmet-1024x1024.webp) | Lincoln Electric VIKING 3350 | Brand-name Helmet | 4 Sensors | DIN 5-13 | DIN 3.5 | 3.74″ x 3.34″ | Check Current Price Amazon |
![Best Custom Welding Helmets & How To Paint Your Hood [2025] 3 YesWelder M800H-CP](https://weldingpros.net/wp-content/uploads/2022/10/YesWelder-M800H-CP-Welding-Helmet.webp) | YesWelder M800H-CP Helmet | Get 10 Off With Coupon: "-10 WELDPROS" | 4 Sensors | DIN 5-13 | DIN 4 | 3.93 x 3.66 inch | Check Current Price YesWelder |
![Best Custom Welding Helmets & How To Paint Your Hood [2025] 4 Jackson Safety Helmet](https://weldingpros.net/wp-content/uploads/2022/11/Jackson-Safety-W40-Insigth-Custom-helmet.webp) | Jackson Safety Ultra-Lightweight | Lightweight | 4 Sensors | DIN 9-13 | DIN 4 | 3.93″ x 2.36″ | Check Current Price Amazon |
![Best Custom Welding Helmets & How To Paint Your Hood [2025] 5 Dekopro Welding Helmet](https://weldingpros.net/wp-content/uploads/2022/11/DEKOPRO-Solar-Powered-Welder-Mask-Blue-Eagle-Design-1024x1000.webp) | DEKOPRO Welding Helmet | Inexpensive | 2 Sensors | DIN 9-13 | DIN 4 | 3.62’’ x 1.65’’ | Check Current Price Amazon |
![Best Custom Welding Helmets & How To Paint Your Hood [2025] 6 Lincln Electric K4134-1](https://weldingpros.net/wp-content/uploads/2022/10/Lincoln-Electric-K4134-1Ratchet-helemet-e1667217194809-912x1024.webp) | Lincoln Electric K4134-1 | Budget Brand-name | 2 Sensors | DIN 7-13 | DIN 4 | 3.82"x1.73 | Check Current Price Amazon |
Best Custom Welding Hood for money – Reviews
1. Lincoln Electric VIKING 3350 Steampunk Welding Hood
This nifty Steampunk modification is one of the top 10 helmets today. Lincoln Electric VIKING 3350 has the finest optical clarity available in a welding helmet today and the largest viewing area in its class (3.74 in x 3.34 in (95 mm x 85 mm)).
It can also be used with magnifying the “CHEATER” capable lens. The shading level is from 5 to 13. Very low shading level is used for welding with very low amperage and for Oxy-fuel welding and Plasma cutting.
It has four sensors and works on a combination of solar cells and a replaceable battery. The advanced headgear is fabricated for improved comfort and a superior fit.
The 4C Lens Technology improves visibility and diminishes eye strain with a wide-screen. In the Lincoln Electric VIKING, There is ample room for a respirator which you should wear if welding fumes are blowing your way. The face visor can operate at -10°C – +55°C (14°F – 131°F).
Pros
- 4C Lens Technology.
- The extra-large view.
- Comfortable.
Cons
- The grinding button is inside.
- Expensive.
2.YesWelder M800-CP Cyberpunk Graphic
Are you a Cyberpunk fan? With YesWelder M800-CP, you can have a cool welding helmet that’s also pretty functional and reliable.
This is actually a YesWelder M800HP series ADF welding helmet that offers a true color view feature with 1/1/1/2 optical clarity.
I liked the large 3.93″X 3.66″ viewing area, so you don’t have to worry about tunnel vision. Qute opposite, you get full view of your welding environment.
There are 4 arc sensors that detect welding arc light, so you don’t have to worry about getting flashed in cramped spaces. The ADF function is great and fast, and you can adjust the sensitivity. I liked the external controls that are large enough so you can use them with gloves on, and you don’t have to flip the helmet occasionally.
As for the bad sides, many welders disliked the headgear. Seems like that’s the thing with any budget welding helmet supplier, but you can buy a replacement for a few bucks. In addition, keep in mind that this is not a professional-grade helmet aimed at long shifts and everyday welding. Nonetheless, it can be your perfect and stylish first welding helmet.
Pros
- Best welding helmet for the money spent
- High-quality graphics and excellent helmet features
- True color view with excellent optical clarity
- Precise and fast ADF function with 4 sensors
- Good welding helmet for beginners
Cons
- Not a professional-grade helmet
- Headgear is not so great
3. Lincoln Electric Lone Star Welding Helmet – K4134-1
If you are looking for an awesome brand-name helmet but are on a tighter budget, Lincoln Electric Lone Star is an excellent choice. This is yet another decent-quality helmet from Lincoln, with amazing graphic design, that will leave an impression in your workplace or welding school.
Lone Star is a somewhat simplified version of Viking welding helmets from Lincoln, with a smaller 3.82″ x 1.73″ viewing area. However, it offers great 1/1/1/2 optical clarity and decent build quality, and grinding mode.
ADF function is quick and reliable so that you won’t get flashed. The good side is that graphics aren’t glossy, so they won’t come down after a short time. Due to its price, the Lone Star helmet has only 2 arc sensors that can get blocked in tight spaces.
Nonetheless, many consider it super easy to use and adjust. I loved the ratchet-style headgear, which is comfortable, but it might pull some of your hair if you tighten it too hard. Still, it is more durable compared to the budget welding helmets we listed.
Considering its price, you shouldn’t really stress-test this helmet. In addition, the TIG amp rating goes down to 8 amps, so it is not suitable for delicate work. However, many liked the lightweight that doesn’t cause neck fatigue.
Pros
- Budget brand-name helmet
- Durable but lightweight
- Nice clarity with decent features
- Long battery life with solar cell power
- Easy to use and adjust
Cons
- Made of plastic
- Not for low amp TIG welding
4. Jackson Safety Insight Variable Auto Darkening Welding Hood (46101), HLX, 370
One more hood that has almost all the features of the expensive ones for nearly half the price. It’s got great American stars and stripes graphics, a simple but cool decorative motif.
This quality lens gives you variable shade (9-13) and wide view dimensions (3.93″ x 2.36″). It has four independent auto dimming sensors and easy-to-use digital controls. I like the craftsmanship of the combination of solar cells and batteries.
They’re the standard coin-like batteries that are used in many auto-darkening helmets. It’s made of quality Nylon 66; a very durable, bendable, and light material. There is room for a small respirator inside.
The headgear is a simple configuration but it’s great and comfortable and stays in place. What I don’t like about it is all the buttons are inside. That makes it hard to replace the front cover for the lenses. You have to remove the whole darkening unit through the back to put in the front lens. Otherwise, it’s a great welding helmet.
Pros
- Inexpensive.
- Good display.
- 4 sensors.
- Made of quality material.
- Durable.
Cons
- All the adjustments and buttons are inside.
- The complicated process for replacing the front cover lenses.
Inexpensive
5. DEKOPRO Solar Powered Welder Mask Blue Eagle Design
This is the least expensive welding hood out there with decent characteristics. It has a striking American eagle paint job if you want to show people how big of a patriot you are, or you just like eagles.
It goes from light to dark in 1/25000 sec, has UV and IF protection when not in dark mode to protect your eyes. It meets ANSIZ87.1-2010 and EN3794/9-13 standards with 3.62’’ x 1.65’’ clear visor viewing area and two sensors.
It has a standard shade adjustment for 9 to 13DIN. It is powered by solar cells and batteries. It’s extremely lightweight (1 lb) and has room for a respirator.
Because it’s not made of the best materials, it’s not recommended to drop or throw it when you’re angry. Replacement parts are also very inexpensive. You shouldn’t use it on temperatures below 0 degrees Celsius.
Pros
- Inexpensive.
- Cool design, inexpensive replaceable parts.
- Meet the standards.
- Good for beginners.
Cons
- Small view size.
- 2 sensors.
- I don’t recommend it for some serious work with big amperages.
6. Review of the Most Popular Welder’s Mask for Painting Antra AH6-260-0000 Auto Darkening Welding Helmet
Are you the type of welder that likes to take the matter into their own hands? Well, I know a few of such guys and I know that they would rather paint their own hood than buying one just because of the paint job.
The Antra AH6-260 Classic Series is a very popular mask for custom paint jobs and it’s no surprise considering its price range and features.
First of all the mask’s shape is great for painting and its sharp geometric features offer a wide variety of designs for creative people. But what about actual welding features?
Antra AH6-260 is a budget option but it offers more than enough for most jobs. It is an auto tinting hood that has 4 sensors that react in 1/25,000 of a second. The shading ranges from DIN 5 to DIN 13 with a light shade of DIN4. The view area is quite large with dimensions of 3.86″X1.73″.
It is lightweight and the headgear is good so that even if you use it for the whole day your neck will not feel fatigued at the end of the day. The helmet also has an external knob to set the shade and the grind mode which makes any welder’s life easier.
The hood also supports the cheater lenses and the hard hat adapter which is sold separately. It uses solar energy and the replaceable batteries as the power source. It also has a built in passive filter which provides IR/UV protection at all times with the shade level of 13.
Pros
- Inexpensive.
- Cool design – Perfect for Custom paint jobs
- Meets the standards
- Good for beginners and more demanding users
- Fairly large view area
- Lightweight
- Cheater lens support
- Made from high impact polyamide-nylon
- Outside knob
Cons
- Headgear could be better
- Instructions on assembly/disassembly are not easily understood
- The shell is not rated for industrial use so no heavy use is recommended
What are the Top Welding Helmets in General?
While the helmets reviewed above are an excellent choice if you are looking for commercially available custom paint job helmets, they are not as good as the top of the line hoods like those from Optrel, 3m and others.
In our separate article, we made a thorough buying guide for the best welding helmets you can find. If you are looking for the top gear then you should definitely check it out. Additionally, we reviewed the quality budget options which can also be modified and below you will learn how to make a custom hood yourself.
How To Make A Custom Welding Hood:
Now that we’ve covered all the best welding helmets out there, we’re ready to talk about how to customize your headgear. Follow these simple instructions to apply for your custom paint job and show the other welders who are the boss. If you are looking for more inspiration, then you should check out our article about welding helmet makeovers where we showcased some amazing designs from various welding helmet artists.
Are You Ready?
1. Gather Your Materials
The first thing to keep in mind is the danger of heating up non-heat-resistant paint.
Exposing non-heat-resistant paint to high heat can reactivate toxic fumes which are not healthy for you to breathe.
If you weld frequently, you need to use heat-resistant paint. Acrylic paint should be okay if you weld only on occasion. However, heat-resistant paint is still recommended.
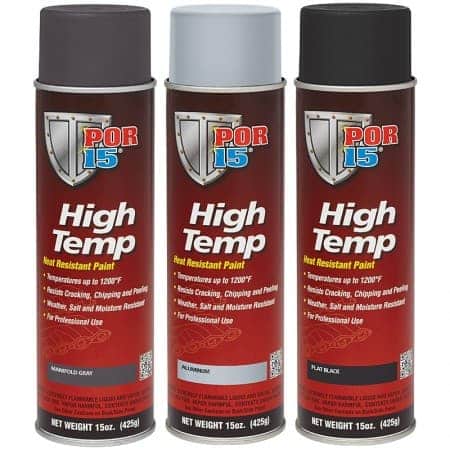
Heat Resistant Paints:
- Rust-Oleum Heat Resistant Paint 750°C
- POR-15 High-Temperature Heat Resistant Paint
- VHT high heat coatings
Welders probably don’t need to be told to make sure there is proper ventilation, but safety counts- so make sure you do your priming and painting in a well-ventilated area.

Non-Heat resistant Acrylic Paints:
- Rust-Oleum Spray paint
- Krylon Fusion for plastic
Other Materials:
- Fire-resistant primer
- A wire brush or wire wheel
- 400 grit sandpaper or finer
Disassemble Your Helmet
It’s pretty common that people will tape off sections they don’t want to be painted in just about any painting job. But in this case, you can do the job more easily, and with less mess and expense if you just disassemble your helmet.
It might seem like more work, but in the end- you’ll be glad you took your helmet apart. Unless you’re a professional painter, chances are you will end up overpainting your lens or some other critical component. If that happens, your helmet will not look super sharp- and that’s the point- isn’t it?

More importantly, professional-grade helmets are not cheap. You want to treat your helmet right and maintain it’s full functionality. Right? Right. So, disassemble your helmet, and set the delicate (and expensive) components aside where they will be safe.
3. Clean & Prime Your Helmet
After you’ve got your helmet broken down and the delicate components set and secured to the side, it’s time to clean it.
If your helmet has seen a lot of action, you might need to start with the wire wheel or wire brush. If not, sandpaper should do the trick.
Cleaning in a nutshell
First, use your 400 grit sandpaper to remove the protective plastic coating. Your primer and paint will replace this protective layer. Make sure to get it nice and smooth, removing any dirt, stuck on carbon, or what have you. It’s especially important to clean around the edges. The edges can admit moisture and dirt that will peel off the paint if the edges are not clean and smooth.
Once you’ve done that, wipe it down with rubbing alcohol until all of the extra grease and dirt are gone. This also assures that nothing biological that could grow, bubble, and cause your paint to flake is living on the surface. Then wipe it down with a dry paper towel.
Finally, give it a once over with the wire brush. This ensures the surface is coarse enough to hold on to the primer and paint. You can skip this step if your helmet already has some texture to it.
Then you can prime your helmet. Some people don’t think this step is necessary, but it will help protect your helmet and make the paint job last longer. You can skip it if you want, and go right on to painting.
If you do prime it, just let it dry first for at least 8 hours before painting.
4. Paint Your Helmet
Congratulations. You made it to the fun part. First apply a clear coat, preferably in a neutral color, (white or grey). Give the neutral paint time to dry and then apply your chosen color.
5. Let Your Custom Helmet Dry
Finally, set your newly customized helmet on a hat rack, helmet stand- or something that will do the same job. Ideally, set it up someplace where dust and debris will not fall on it. You could set up some light stands and throw a tarp over that if you can’t find a dust-free area.
Then, just give it a good 12 to 24 hours to dry and you’re ready to weld in style.
Conclusion:
As the most vital piece of safety equipment, a welding helmet not only offers needed protection to the face and eyes but it gives wearers a chance to add a touch of personal style to their badass welding gear. Due to issues such as needing to constantly flip the helmet up and down and keeping the MIG gun, TIG torch or stick an electrode in the proper position, most welders are trying auto-darkening helmets.
Welding has in recent times gone mainstream with #weldernation and #weldingrigz plus Welder Nation on Facebook. There’s even a Facebook page for Welder Memes.
![Best Custom Welding Helmets & How To Paint Your Hood [2025] 8 YesWelder M800H CP Welding Helmet](https://weldingpros.net/wp-content/uploads/2022/11/YesWelder-M800H-CP-Welding-Helmet.webp)
![Best Custom Welding Helmets & How To Paint Your Hood [2025] 12 image of Antra AH6-260 Welding Helmet](https://weldingpros.net/wp-content/uploads/2021/08/Antra-welding-helmet-e1628854085201.webp)


